

By Elliot Philpott
15 Mar 2024 · 14 Min Read
What are Google Ads ad Assets?
Ad assets are additional pieces of information about your business that you can include in your Google ads on the SERP to influence customer engagement and purchase decisions. There are 15 different types of Ad Asset that can be added at Account, Campaign or Ad Group level.
Ad Assets are believed to be fundamental to ad performance and visibility. Therefore, before we delve into the different types of Assets and how to create them in Google Ads, let’s first take a look at why it’s important to include as many as possible that are relevant to your business.
Why use Google Ads ad assets?
Ad assets provide additional real estate to your ad copies which can be used to include extra information highlighting the appeal of your products and services. This extra real estate also allows you to experiment with more creative and emotionally stimulating calls to action, which is always more difficult to do with limited characters. Thus, Ad Assets are great for advertisers with loads to say but find Google’s character limits to be, well, limiting.
In addition to providing more real estate to ad copies, ad assets are also extremely important for different performance metrics including visibility, CTR and even conversion rates.
Adding more relevant content to your ads will boost their quality score by increasing relevance, which means that your ads will receive more prominence by being displayed higher up on the SERP. Consequently, more people are likely to see, and thus interact with, your ads. This will then have a positive knock-on effect on CTR, conversion rates and returns on investment. Indeed, Google has reported that including Assets can boost CTR up to 20%.
Bananas, right?
However, it is important to note that you shouldn’t add assets just for the sake of adding them; relevancy is key! Adding assets irrelevant to your goals or calls to action can have adverse effects on your quality score.
This can then negatively impact your CTR and conversion rates. Thus, though assets are a great solution for increasing ad real-estate and boosting performance, you shouldn’t go overboard with them and only include them where appropriate.
How to create Google Ad assets.
Ad assets can be created very easily using Google Ads. After signing in to your account, find the ‘Campaigns’ tab on the left side of the page and then click on ‘Assets’.
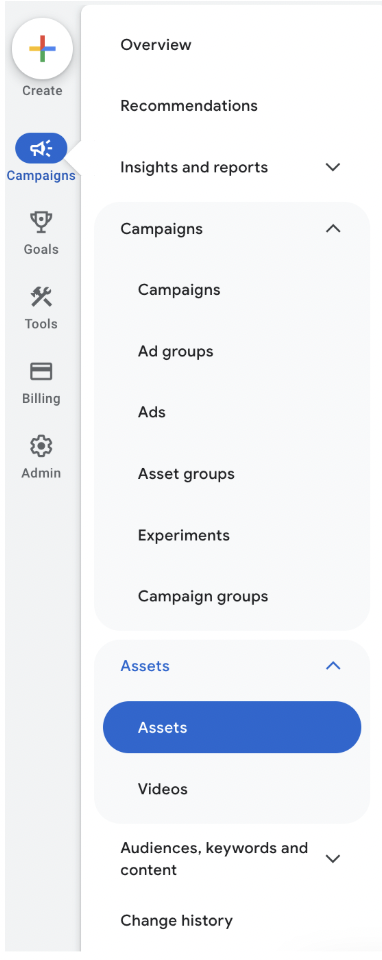
Once you are on the assets page, you should see a ‘+’ button on the left-hand side.
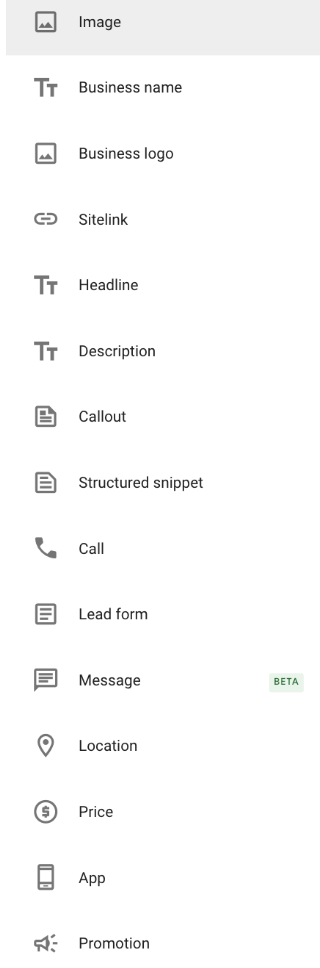
When you click on the ‘+’ a drop-down menu should appear with the available extension options.
Once you create an ad asset, you will be able to view its approval status (yes, assets need to be approved by Google), policy data, and performance stats within your Google Ads account. This also includes individual performance metrics for each extension such as CTR and conversion rates which can be viewed within the Google Ads editor.
Assets can be created and associated across your account/campaigns/ad groups within Google Ads Editor - often a much quicker way to build-out ad assets en-masse.
It’s also possible to create and dynamically update assets across multiple campaigns or ad groups by utilising Business Data Feeds, within the shared library of your Google Ads account. If you would like to learn more about Business Data Feeds, then here is a handy guide. As aforementioned, Google offers 15 different types of ad assets.
Below we’ll take a closer look at 10 core asset types, what they entail and how to add them. If you already know which asset you are looking for, then feel free to skip ahead to the relevant one!
Types of Google Ads ad assets.
Sitelink assets.
Sitelink assets are essentially mini ads that direct customers to specific pages on your site. They allow users to highlight the different categories of products or services offered using an additional header of up to 25 characters and 2 lines of description of up to 35 characters each.
Sitelinks improve customer experience and boost conversion rates by directing users to the most relevant areas of your site upon clicking. Thus, they remove the need for customers to navigate your site to find the product they are interested in. Google requires at least 2 Sitelinks for them to appear on your ad and how they appear depends on factors such as device type.
However, these assets are quite versatile and even allow you to review their individual performance metrics including impressions, CTR and conversion rates. Therefore, they are great for businesses with websites consisting of multiple pages.
How to add a Sitelink, you ask? Simply select it from the list of asset options and specify the level at which you would like to add it (i.e., Account, Campaign or Ad Group).
You can then either choose from an existing Sitelink or create a new one by filling in the text you’d like it to display and its unique URL. Click save, et voila. You’ve got yourself a Sitelink asset.
Callout assets.
Callout assets offer an additional 25 characters which can be used to highlight your business’s unique selling points (USPs). However, unlike Sitelinks, they can’t be clicked on.
If you can convey all relevant values of your business in your main ads, then Callouts may not be useful to you, especially as you can’t duplicate text in them. However, they are free real estate that you can use to make your offer look more appealing, which could consequently help you bag more clicks.
They are essentially little goodie-bags of free characters that Google gives you. Fabulous, right?
To add a Callout asset, select it from the list of assets and specify the level at which you would like to add it to. You can then choose between using an existing Callout or creating a new one. To create a new one, all you need to do is to add your text in the ‘Callout text’ field. You can additionally set a preferred device type or scheduling using ‘Advanced Options’, but it’s simple as that.
Oh, and don’t forget to click ‘Save’ when you’re done!
Structured Snippet assets.
Structured Snippet assets allow you to highlight the features of your products or services. Each Snippet is made up of a category header followed by values, and each value has a maximum limit of 25 characters. However, Google recommends a 12-character maximum for mobile devices.
A digital marketing firm could use this to advertise their Services (category) including PPC, Display, SEO, Content, CRO, etc. (values). Alternatively, a hotel could use this to flaunt their Amenities (category) such as Free Wifi, Swimming Pool, Gym, Laundry Service, etc. (values). As long as you provide enough information and optimise for mobile users, these assets are great for helping customers instantly identify what you have to offer.
To add a Structured Snippet asset, find it in the assets list and choose the level at which you would like to set it. You can then either add an existing Snippet or create a new one. Creating a new Snippet would require you to choose a language and header from their respective dropdown menus.
After that, you would need to enter at least 3 values. You can also select a device preference and schedule using ‘Advanced Options’. Finally, hit the ‘Save’ button when you’re done and your asset will be ready to go!
Call assets.
If you expect leads to come in via calls or have the capacity to handle unscheduled incoming calls, then Call assets can be very useful to you. Call assets drive up conversion rates by removing the need for customers to manually dial up your number. This may be especially beneficial for mobile users who are more likely to have an immediate need to enquire and who would otherwise have to endure the inconvenience of leaving the SERP to place a call.
Call assets appear as phone numbers or a phone icon around your ad which customers can click on to directly place a call. Thus, they are a great way of making it extremely easy for your customers to reach you and convert.
To add a Call assets, select ‘Call’ from the list of assets and then select the level at which you would like to add it. Then you can either add an existing asset or create a new one by adding in your phone number. Simple as that.
However, there are also some additional settings that you can play around with, such as call reporting and call conversions, so don’t be scared to explore and don’t forget to ‘Save’ when you’re done
Location assets.
Location assets, as its name suggests, allow you to highlight the physical address of your business. They can also feature your phone number, operating hours and a map marker to help customers determine their distance from your business. They are excellent for businesses that serve customers in brick-and-mortar locations or whose location will play a major role in customers’ purchase decisions.
To set up a Location asset, select ‘Location’ from the asset options menu and select the level at which you would like to set it. If you are a major retailer, then you can add a chain store (curated) location as your Location asset. Otherwise, you would have to use your verified locations by linking your Google My Business account. If you don’t currently have a Google My Business account, here is a useful guide to help you set it up.
Once you’ve linked your Google My Business account, you will be able to select all of your synced locations, filter out locations with specific features, or form particular location groups. You can also like to add a phone number and here is a handy guide on how to verify your number. Admittedly, Location assets are a bit tricky, but even the trickiest assets need to be saved!
Price assets.
Price is a major determinant for any customer, which is why adding Price assets is a great way to boost conversion rates. This is because being transparent about your prices will more likely attract interested customers who accept the costs of your products or services. In other words, it reduces the likelihood of someone clicking on your ad, hunting down your prices, and then deciding not to convert after finding it too expensive.
Price assets also allow you to display your offers in detail and enhance customer experience by directing customers straight to the offer page. All in all, they are a real facilitator for conversions!
To add a Price asset, choose the level at which you would like to add it and enter the asset’s language, type, currency and price qualifier. It ought to be noted that there are only a selected number of languages and currencies available for price extension, thus, it may not be eligible for all businesses. If the language and currency of your business are available, you can continue to include a header and description of up to 25 characters each, although Google recommends a 12-character limit for mobile phones.
You would also need to add the final URL to the product or service page.
Each extension requires a minimum of 3 items, although Google recommends at least 5. Price assets are another tricky one to add as Google has specific requirements for the different types available. Nevertheless, once you are happy with your asset, don't forget to click ‘Save’!
App assets.
App assets are little ‘install’ buttons that appear only for searches on mobile and tablet devices to increase visibility for apps. They enhance customer experience by directing users directly to the app upon clicking, with Google's ‘smart’ detection helping correspond to the app store to which customers are redirected with their device's operating system. For example, iOS users will be directed to the Apple App Store whereas Android users to Google Play. Thus, this asset is recommended for any business with an app to promote.
Before you can add an App asset, you need to ensure that you have a live app within Google Play or App Store. Once that is confirmed, select the ‘App asset’ option, choose the level at which you would like to set the asset and either import an existing asset or create a new one. You should know the drill by now.
To create a new one, enter the name of your app and choose between its Android or iOS version. You can also include a text as your call-to-action and set custom tracking parameters and schedules for the asset to show. Once you are done, don’t forget to save your changes!
Promotion assets.
Customers love a good bargain, and Promotion assets allow you to highlight exactly that. These assets can feature monetary or percentage discounts and will appear underneath your ads with a visible price-tag icon to highlight sales or offers.
They also allow you to display offer dates, promotion codes, as well as up to 20 characters of text for any additional enticing information that you might like to add.
Upon clicking, customers are directed straight to the offer without having to navigate your website. Therefore, Promotion assets also act as a conversion shortcut.
These assets are available at any time of year, although Google offers special occasion tags such as “Back-To-School” or “Boxing Day” for the festive seasons. Thus, Promotion assets are a handy way of grabbing the attention of customers looking for a good deal (which, aren’t we all?).
To add a Promotion asset, select it from the list of asset options and choose the level at which you would like to add it. You then have the option to select an occasion for your promotion or use ‘Advanced Options’ to set custom promotion dates. Language, currency and ‘Promotion Type’ (i.e., monetary or percentage) would also have to be selected, as well as the item’s name and final URL.
You also have the option to set a promotion requirement such as a promo code, as well as a start and end date for your asset to show. Finally, don’t forget to click ‘Save’ when you are happy with your changes!
Lead form assets.
Lead Form assets allow you to attach a lead form to your search ads on mobile devices to collect contact information from your customers directly. They make it quick and easy for customers to engage with your business and encourage conversions by redirecting them to a Google-hosted form already filled with their contact details which can be submitted with the click of a button.
The leads you collect are stored by Google for up to 30 days and can be easily downloaded as a CSV file. The information can then be added to your marketing funnel as conversions or used to create remarketing lists of engaged customers.
To add a Lead Form asset, select the ‘Lead Form’ option and then the campaigns you would like to attach it to.
Then you would need to create your lead form. This includes your business name, an appropriate header of up to 30 characters as your primary call-to-action on the form and a description of up to 200 characters providing context to your offers.
This would be followed by choosing the information you’d like to collect from your customers and entering the URL to your privacy policy. You also have the option of including a background image behind your lead form with a recommended dimension of 1200 x 628.
Google also requires you to create a submission message of up to 200 characters. Moreover, you can include a link to your landing page in addition to the submission message for customers who may like to visit your site.
Finally, you can opt to manually download your collected lead forms or to manage them using a webhook.
This would allow your customer data management system to directly download collected lead forms in real time. To learn more about webhooks and how to set them up, here is a handy guide for you. Once you’re done, don’t forget to click ‘Save’ as always!
Image assets.
Image assets allow advertisers to insert a complementary image next to their search ads.
Image Assets accept both square and landscape images. However, Google is a bit funny about this in the sense that a square image is mandatory whereas a landscape image can be added as a secondary, optional image. The recommended pixel size is 1200 x 1200 for a square image and 1200 × 628 for a landscape image with a ratio of 1.91:1
Select it from the list of extension options and select the level at which you would like to add it. To create a new Image asset, simply click on the ‘+’ in the images box and choose the file you’d like to upload. If you don’t have a particular image to upload, you can enter the URL of your site and Google will scan the page for an appropriate image. Once you’re done, click ‘Save’, et voila.
Other assets.
In addition to the 10 core Ad Assets outlined above, there are 5 more which are more straightforward to add in.
- Headlines
- The most prominent and important part of your text ad. They are the blue, clickable text that users see first when they encounter your ad on the Google search results page.
- You can provide up to 15 headlines, with a minimum of 3 needed.
- The text can be up to 30 characters per headline. This is a strict limit, so every character counts!
- Descriptions
- Descriptions are the longer, more detailed blocks of text that appear below the headlines in your text ad. They give you the space to elaborate on your offer, highlight key benefits, and provide a stronger call to action.
- You can provide a minimum of 2 descriptions and up to a maximum of 4.
- Maximum 90 characters per description. This gives you much more room than headlines to provide context and details.
- Message Assets
- A clickable button on your ad that, when a user taps it, opens a conversation with your business in their preferred messaging platform, such as WhatsApp.
- A new Asset type which is currently in the Beta phase
- Business Name
- A small, branded line of text that appears at the top of your ad, next to your logo. Its purpose is to clearly identify your business and build brand recognition directly on the search results page.
- Business Logo
- A small icon or image which appears alongside your text ad on the Google search results page.
- Google recommends you a square (1:1) logo.
- The logo must be a PNG or JPG file.
- Recommended specs: 1200 x 1200 pixels.
Final thoughts.
Phew, that was a lot of information! Now that we’ve covered the basics of ad assets, you might be thinking “Well, which ones am I supposed to include to optimise my ad performance?”. If you are feeling a bit overwhelmed and spoilt for choice, worry not my friend as I have some good news for you: Google only shows assets when your ad is deemed to have a high enough ad rank and it automatically decides which extension or combination of assets are most useful and beneficial to your ad performance.
This means that it would be silly not to include all relevant ad assets, and let Google figure out how and when to show them! But as I’ve mentioned in the beginning, as with everything in life, prioritise quality over quantity and don’t go overboard with your ad assets just because you can. If you'd like to talk ad assets with us, feel free to reach out to our paid media team, we're super friendly, I promise.
With that being said, I think you’re ready. So go ahead, Happy asseting!